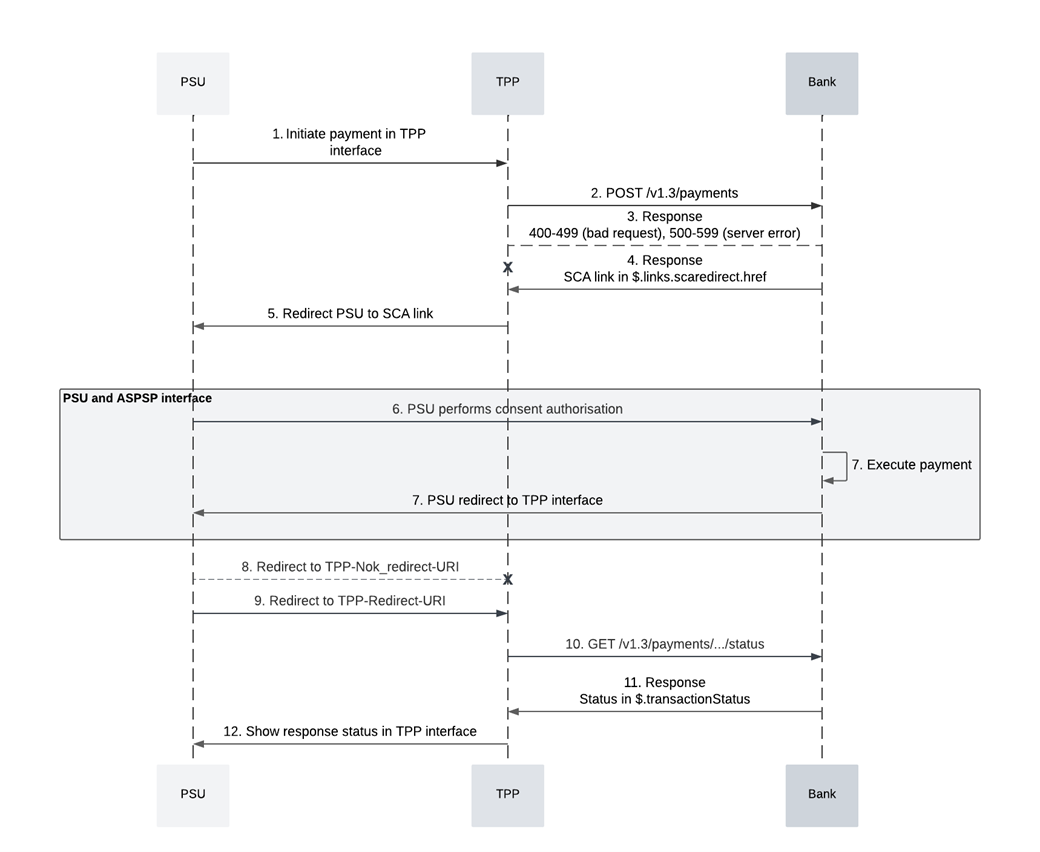
Payment initiation
Overview
The Payment Initiation Service (PIS) allows TPPs to initiate payments. To initiate a payment, TPP needs authorization (transaction approval) from the Payment Service User (PSU). PSU grants his/her consent during the SCA session
Flow description
Below is the description of the integration flow in which the TPP initiates a regular Domestic KIBS Credit Transfer. This flow assumes that
- TPP opts for an explicit start of authorization by setting the header
Client-Explicit-Authorisation-Preferred: True; - Bank requires Redirect SCA for the initiated transaction.
Note: The flow representation below concentrates on the communication between TPP and the Open Banking Platform's (OBP's) XS2A interface, simplifying the details of OBP-Bank interaction.

Step 1
The Payment Service User (PSU) starts the payment process via the TPP interface.
Step 2
TPP calls
POST /payments/domestic-credit-transfers-kibs to initiate the payment:curl -X POST "https://api.ob.kibs.mk/pis/v2/payments/domestic-credit-transfers-kibs" -H "X-Request-Id: dc7b16a5-4ac8-4fdc-9c4e-9f9d0387dc07" -H "Content-Type: application/json" -H "PSU-ID: 446456475755" -H "PSU-IP-Address: 123.321.123.321" -H "Client-Explicit-Authorisation-Preferred: True" -H 'Authorization: Bearer eyJhbGciOiJSUzI1NiIsInR5cCIgOiAiSldUIiwia2lkIiA.......' -d '{ "categoryPurposeProprietary": "3", "purposeProprietary": "999", "debtorAccount": { "iban": "MK07200002785493215", "currency": "MKD" }, "creditorAccount": { "iban": "MK07200003215498765", "currency": "MKD" }, "creditor": { "name": "ABC Company" }, "debtor": { "name": "John Doe" }, "instructedAmount": { "currency": "MKD", "amount": "25000.00" }, "chargeBearer": "SHAR", "creditorAgent": { "bic": "KOBSMK2X" }, "debtorAgent": { "bic": "EXAMPLEMKXXX" }, "requestedExecutionDate": "2025-12-28" }
Step 3
OBP returns a unique transaction ID for the payment:
{
  "paymentId": "e521cf62-a45f-49c5-8372-94853fffeb55",
  "transactionStatus": "RCVD",
  "_links": {
    "startAuthorisation": {
      "href": "payments/domestic-credit-transfers-kibs/e521cf62-a45f-49c5-8372-94853fffeb55/authorisations"
    }
  }
}
Step 4
TPP calls
POST /payments/{payment-product}/{payment-id}/authorisations (with Client-Redirect-URI and Client-Redirect-Nok-URI headers) to explicitly start authorization (SCA).Step 5
OBP returns SCA Redirect URL (
$.links.scaRedirect.href) for PSU to perform Strong Customer Authentication (SCA):{ "scaStatus": "received", "authorisationId": "d3f9c3f2-7a8f-4c7f-9b7e-b02e6fdc9420", "_links": { "self": { "href": "/pis/v2/payments/domestic-credit-transfers-kibs/e521cf62-a45f-49c5-8372-94853fffeb55/authorisations/d3f9c3f2-7a8f-4c7f-9b7e-b02e6fdc9420" }, "scaRedirect": { "href": "https://bankscaserver.com/auth/d3f9c3f2-7a8f-4c7f-9b7e-b02e6fdc9420" } } }
Step 6
TPP redirects PSU to Bank's SCA Redirect URL. This is a bank's web page where PSU is expected to authenticate and authorize transaction.
Step 7
PSU completes authorization in the bank’s interface (web or mobile).
Steps 8
The bank processes the payment internally.
Steps 9-10
The bank redirects PSU back to TPP using the Client-Redirect-URI provided by TPP.
Step 11 TPP calls
GET /payments/{payment-product}/{payment-id}/status to check the current payment status.Step 12
OBP queries the bank for the latest payment status.
Step 13
The bank provides OBP with the payment status.
Step 14
OBP sends the payment status back to TPP:
{
  "transactionStatus": "ACCC"
}
Step 15
PSU is informed of the final payment result through TPP interface.
PIS-specific error codes
| Scenario | Error |
|---|---|
| The addressed payment product is not supported by the ASPSP. | 404 – PRODUCT_UNKNOWN |
| The payment initiation POST request failed during the initial process. Additional information may be provided by the ASPSP. | 400 – PAYMENT_FAILED |
| This service is not reachable for the addressed PSU due to a channel-independent blocking by the ASPSP. | 403 – SERVICE_BLOCKED |